A rondo session plan for teaching pressing to under-12s to under-14s
A complete 75-minute session for grassroots coaches that uses rondos to teach young players how to press together, and how to keep the ball when they are pressed.
By Callum Rees 8 min read
Key facts
- Topic
- Coaching
- Written by
- Callum Rees
- Published
- Reading time
- 8 minutes
In short
- Session length: about 75 minutes, building from a 4v1 rondo to a directional game and a small-sided match.
- Suits under-12s to under-14s, with 12 to 16 players, around 30 cones, bibs and plenty of balls.
- Pressing focus: a curved first-presser run and a second presser who blocks the split pass.
- Escaping focus: an open body shape, good support angles and moving the ball before pressure arrives.
Rondos are the most useful practice I know. In one small square, players work on pressing, passing, moving and thinking under pressure. This is the full session I used with under-12s to under-14s when I wanted them to learn how to press together, and how to stay calm when they were pressed themselves.
Why rondos work for pressing
A rondo is a possession game where one group keeps the ball in a small area while a few players in the middle try to win it. The outside players have more people, so they should keep the ball. The players in the middle have to work together to stop them.
That makes it ideal for teaching pressing. One defender on their own in a rondo will run around forever. Two defenders who work together, with one pressing and one cutting off a pass, will win the ball. Players learn that lesson far faster by feeling it than by hearing me explain it.
The same game teaches the other side as well. The outside players learn to open their body, offer an angle and move the ball before the pressure arrives. These are exactly the skills a team needs to escape a press in a real match.
The timings and sizes below are the ones that worked for my groups. Treat them as a starting point and adjust them for your players.
What you need
- 12 to 16 players (I explain how to adapt for other numbers at the end)
- Around 30 cones, two sets of bibs and plenty of balls
- Four small goals, or cones to make them, for the final game
- About 75 minutes
I set up every area before the players arrive. Changing the layout halfway through a session wastes time and loses the players’ attention, especially with younger groups.
Part 1: Warm-up passing (10 minutes)
I start with players in pairs, passing across a gap of about 10 metres. Every pass must be received on the back foot, meaning the foot further from the ball, so the receiver’s body is already open to the pitch.
After a few minutes, I add a third player who jogs towards the receiver as a passive presser. The receiver has to check over their shoulder before the ball arrives and take their first touch away from the presser.
I count out loud how many times each player checks their shoulder. It sounds simple, but at this age many players never look up until the ball is already at their feet. Making it a game gets them doing it without thinking.
Part 2: 4v1 and 5v2 rondos (20 minutes)
This is the heart of the session. I set up the two squares shown in Figure 1 and rotate groups between them every few minutes.
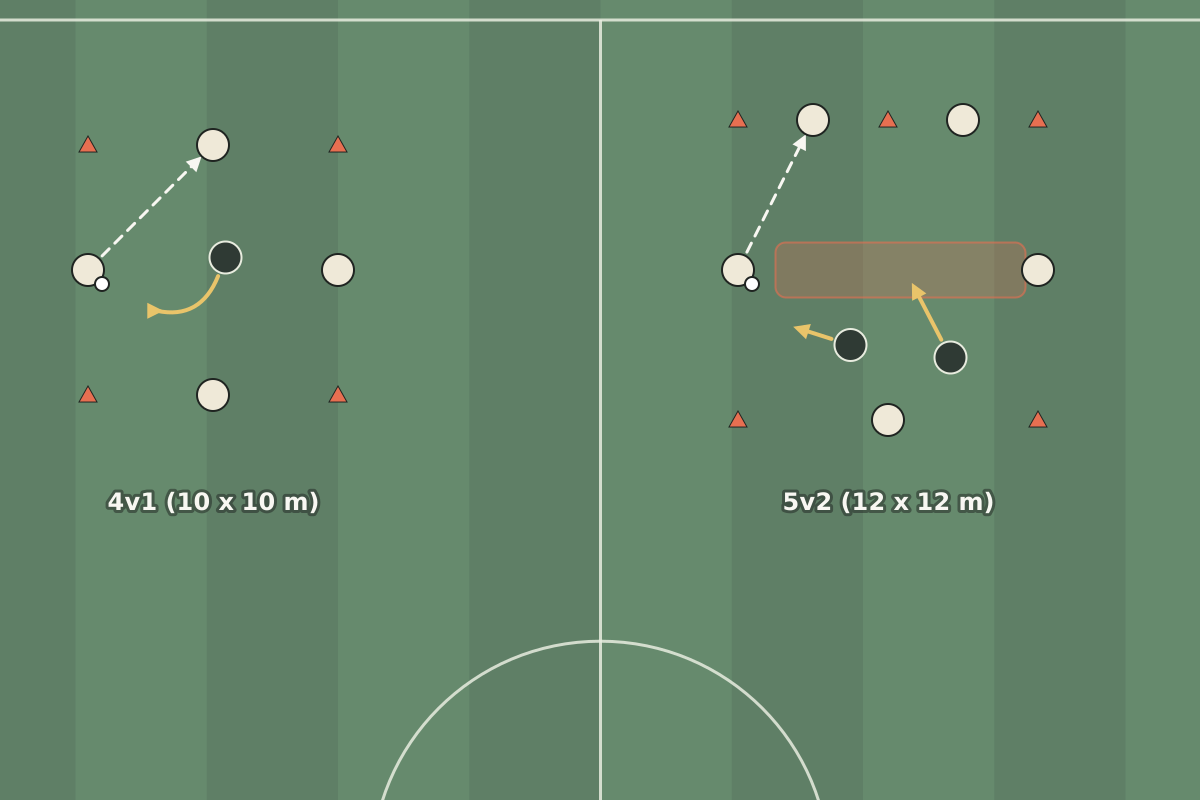
Figure 1: On the left, four outside players keep the ball from one presser. On the right, five outside players face two pressers, and the second presser blocks the pass through the middle (shaded).
The 4v1 rondo
The left square in Figure 1 is a 4v1. Four players stand on the sides of a 10 by 10 metre square, and one presser starts in the middle. The outside players can move along their side of the square but cannot step inside it.
The rules are simple. If the presser touches the ball, or a pass leaves the square, the player who made the mistake swaps into the middle. I usually allow two touches, then drop to one touch for more confident groups.
Watch the presser’s run in Figure 1. They do not run straight at the ball. They curve the run so that their body blocks one of the two nearby passes. That leaves the player on the ball with only one easy option, which makes the next pass predictable.
I introduce the curved run here, with only one presser, so players can feel the difference it makes. A presser who runs straight at the ball gets passed around all day. A presser who curves their run starts to force mistakes.
The 5v2 rondo
The right square in Figure 1 is a 5v2 in a bigger, 12 by 12 metre area. Now there are two pressers, and they have to work together.
The first presser closes the ball, curving their run in the same way. The second presser has a different job. They watch the pass that would split the two pressers, straight through the middle of the square, and moves to block it. You can see that lane shaded in Figure 1.
When the second presser gets this right, the outside players are left with short, sideways passes. Two or three of those under pressure often lead to a mistake. This is the moment I want players to notice: winning the ball is a team job, not a solo effort.
I keep a simple score. The pressers get a point every time they win the ball within five passes. The outside players get a point for every ten passes in a row. Scores make players compete, and competing makes them concentrate.
Part 3: Directional rondo (20 minutes)
A normal rondo has no direction, but real football does. In the next part I add a start zone and an end zone, so the outside team has to move the ball forward, not just keep it.
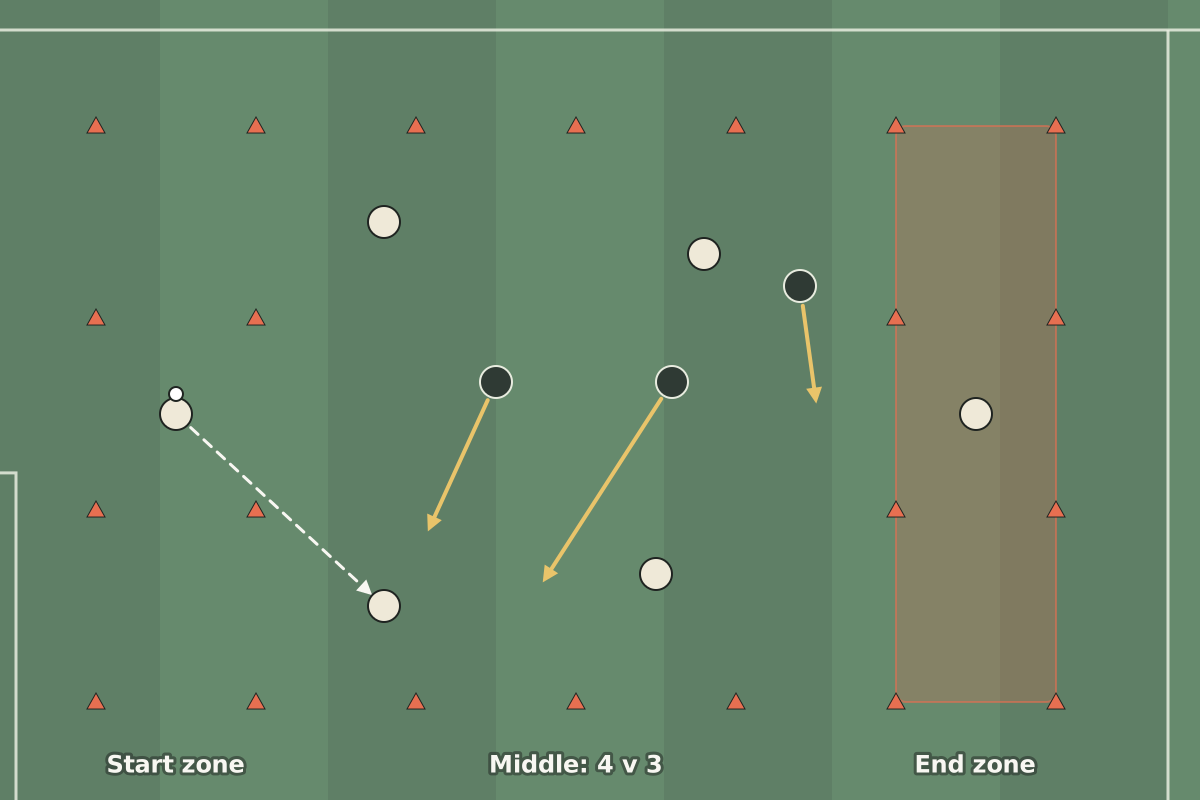
Figure 2: The light team must move the ball from the start zone to the target player in the shaded end zone. Three dark pressers work as a unit: one presses, one blocks the next pass and one screens the target.
In Figure 2, the area is about 30 metres long and 18 metres wide, with a 5-metre zone at each end. A light player in the start zone has the ball, and another light player waits in the end zone as the target. Four light players in the middle zone face three dark pressers.
The light team scores a point by getting the ball from the start zone to the target. The pressers cannot enter the end zones. If they win the ball, they score by dribbling it over either end line, which gives them a reason to press forward rather than sit back.
Look at how the dark players are working in Figure 2. The first presser closes the player who has just received from the start zone. The second presser moves across to block the next forward pass. The third screens the pass into the target in the shaded end zone.
That is exactly the first presser, second presser and cover structure I use with my teams on a Saturday. Seeing it in a small area first makes it much easier for players to repeat it in a match.
For the light team, the lesson is about escaping pressure. When the forward pass is blocked, they must recycle the ball back to the start zone and try the other side. I praise players who switch play quickly, because that is how a team beats a press in a real game.
Progressions
- Start with 4v2 in the middle, then add the third presser once the light team is succeeding comfortably.
- Limit the light team to two touches, then one.
- Reward fast pressing: if the pressers win the ball within five seconds of the first pass, their point counts double.
Part 4: Small-sided game (20 minutes)
I finish with a 6v6 or 7v7 game on a pitch of about 40 by 30 metres, with two small goals at each end. The rules are normal, with one addition. A goal scored within ten seconds of winning the ball counts double.
This rule rewards everything we have worked on. Players who press together win the ball near the opponent’s goal and earn the double reward. Players who play out calmly under pressure avoid giving those chances away.
I try to talk less in the game than in the rondos. If I see a good press, I freeze play briefly and ask the players what triggered it. Then I let the game run again.
Cool-down and review (5 minutes)
At the end, I ask three questions. Who was the first presser when we won the ball? What did the second presser do? What did you do when you were pressed? Players who can answer these in their own words have learned more than players who simply ran hard.
Key coaching points
- First presser: curve the run to block a pass, and slow down for the last couple of steps.
- Second presser: watch the split pass, not the ball.
- Outside players: receive on the back foot, check your shoulder before the ball arrives, and offer an angle rather than standing in line.
- Everyone: react the instant the ball is lost, because the best time to win it back is straight away.
Common mistakes
The most common mistake is both pressers chasing the ball. They end up side by side, and one simple pass beats them both. When this happens, I stop the practice and ask the second presser where the ball is likely to go next.
The second mistake is outside players standing still. They wait on their line and only move once the ball is already coming. I remind them that a good angle has to be made before the pass, not after it.
Another mistake belongs to the coach: making the square too big or too small. If the pressers never win the ball, the area is too large. If the outside players can never string three passes together, it is too small. I adjust by a metre or two at a time until the game feels competitive.
Opinion: I think many coaches abandon rondos too early because they look messy. A rondo full of mistakes is a rondo that is doing its job. The players are being stretched, and the learning comes from those mistakes.
Adapting for different numbers
With fewer than 12 players, run one rondo square and skip the 5v2, moving straight from the 4v1 to a 4v2. For the directional rondo, drop to three players in the middle against two pressers.
With more than 16, set up two directional areas side by side and run them at the same time. Rotate the groups so that everyone plays against different opponents.
For under-12s, who play 9v9 matches, keep the final game at 5v5 or 6v6. For under-14s, who play 11v11, you can stretch it to 7v7 or 8v8 and make the pitch bigger.
If your group includes players of very different abilities, put the stronger players in the middle more often. Pressing is tiring, and it gives them a real challenge without taking the ball away from the less confident players.
The short version
Rondos teach pressing because players feel the difference between pressing alone and pressing together. Start with a 4v1, add a second presser in a 5v2, then give the game a direction. Finish with a small-sided game that rewards winning the ball quickly. Keep the coaching points short, and let the players learn through the game.
Every tactical claim on Pressing Matters is backed by match footage or published data, cited with the match and date. Opinion is labelled as opinion. Spotted a mistake? Tell us and we will correct it at the end of the article.
Written by
Callum Rees
A former youth-team coach from Cardiff with a UEFA B licence, Callum spent eight years running sessions before he started writing about them.
More from Callum Rees